 [email protected]
 (905) 921-2332
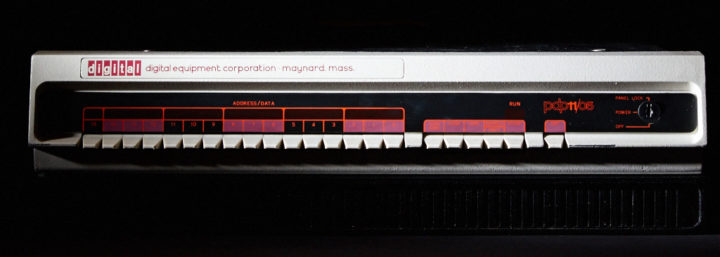
Have you ever wanted to try programming a bare metal machine without an operating system? This post will show you how to get started programming in C on a real PDP-11 or a PDP-11 simulator such as simh. If you want the whole front panel blinking lights experience (and you really do!) but don’t have a real PDP-11, I recommend getting Oscar Vermeulen’s excellent PiDP-11 kit which is a 60% scaled down PDP-11/70 replica with a Raspberry Pi running simh.
I have both the PiDP-11 kit and a real PDP 11/05 with 4KW (8KB) of core memory, a 20ma current loop console port connected to a DECwriter II and a DL11W serial card that provides a second serial port with RS232 connectivity. No disk or tape. I configured the DL11W card for the address and vector normally used by the high speed paper tape reader/punch because the register layout is close enough for the bootstrap programs to read in programs. A laptop running a terminal program that can send binary files pretends to be the high speed reader and allows me to load programs from “paper tape”.
To get started with our bare metal C programming adventure, we’ll need a cross compiler that can build PDP-11 binaries (we will use GCC and binutils) and a machine to run this compiler on. If you’re using a Raspberry Pi with or without the PiDP-11, you’ve already got a machine to the compiling on. You can either compile GCC and binutils yourself or save yourself a couple of hours and download this precompiled package.
To install the downloaded package on the Raspberry Pi, log in as ‘pi’ and execute the following command in the home directory.
tar zxf GCC-PDP11-RaspberryPi.tgzIt will create a ‘bin’ and ‘xgcc’ directory in your home directory with the GCC compiler, assembler, linker and a tool for converting a.out format files to ones suitable for use with the absolute loader.
If you are not using a Raspberry Pi or want to compile your own tools, follow these instructions after installing the development tools for your platform. Additionally, you may need to install the texinfo package if it isn’t already installed. These instructions are based on those found at https://xw.is/wiki/Bare_metal_PDP-11_GCC_9.3.0_cross_compiler_instructions
cd $HOME
mkdir -p src obj/binutils-build obj/gcc-build

# Fetch sources
curl https://ftp.gnu.org/gnu/binutils/binutils-2.34.tar.gz | tar -C $HOME/src -zxf -
curl https://ftp.gnu.org/gnu/gcc/gcc-9.3.0/gcc-9.3.0.tar.gz | tar -C $HOME/src -zxf -

# Download prereqisites
cd $HOME/src/gcc-9.3.0
./contrib/download_prerequisites

# Build binutils
cd $HOME/obj/binutils-build
../../src/binutils-2.34/configure --prefix $HOME/xgcc \
    --bindir $HOME/bin \
    --target pdp11-aout
make && make install

# Build gcc
cd $HOME/obj/gcc-build
../../src/gcc-9.3.0/configure --prefix $HOME/xgcc \
    --bindir $HOME/bin \
    --target pdp11-aout \
    --enable-languages=c \
    --with-gnu-as --with-gnu-ld \
    --without-headers --disable-libssp
make && make install
If you build your own package, you’ll need to install the aout2lda converter program into your $HOME/bin directory. You can download it below (it is already included in the Raspberry Pi package above). You will need Python 3 installed on your machine to run it.
Now that we have the compiler and tools installed, we can start writing our first C program. Lets start with the traditional “Hello World!” program with a small twist to print it 10 times.
#include "console.h"

int main()
{
	int i;
	for (i=0; i<10; i++) {
		cons_puts("Hello World!\r\n");
	}
}
Because we don’t have an operating system, we need to write all our I/O routines ourselves, and the first routine we’ll need is a way to print and read characters on the console. The include file console.h has declarations for these functions:
#ifndef CONSOLE_H
#define CONSOLE_H

void cons_putc(char c);
char cons_getc();
void cons_gets(char *buffer, int size);
void cons_puts(char *s);

#endif
and console.c includes the implementation.
#ifndef CONSOLE_H
#include "console.h"
#endif

#define DL11_RCSR	0177560
#define DL11_RCSR_DONE	0x80
#define DL11_RBUF	0177562
#define DL11_XCSR	0177564
#define DL11_XCSR_READY	0x80
#define DL11_XBUF	0177566

void cons_putc(char c)
{
	volatile unsigned int *xcsr = (unsigned int *)DL11_XCSR;
	unsigned char *xbuf = (unsigned char *)DL11_XBUF;
	while (!(*xcsr & DL11_XCSR_READY)) ;
	*xbuf = c;
}

char cons_getc()
{
	volatile unsigned int *rcsr = (unsigned int *)DL11_RCSR;
	unsigned char *rbuf = (unsigned char *)DL11_RBUF;
	while (! (*rcsr & DL11_RCSR_DONE)) ;
	return *rbuf & 0x7F;
}

void cons_gets(char *buffer, int size)
{
	char c, *p = buffer;
	while (1) {
		c = cons_getc();
		if ((c == '\b') || (c == 0x7F)) {
			if (p > buffer) {
				cons_putc('#');
				p--;
			} else {
				cons_putc(7);	// Ring Bell
			}
		} else if (c >= ' ') {
			if (p < buffer + size - 2) {
				*(p++) = c;
				cons_putc(c);
			}
		} else if (c == '\r') {
			cons_putc(c);
			cons_putc('\n');
			return;
		}
		*p = 0;
	}
}

void cons_puts(char *s)
{
	for (;*s;s++) cons_putc(*s);
}
We need a small amount of assembly code to initialize the stack and set things up so that we can begin executing our main() function. These are in the crt0.s file:
    	.text
    	.even
    	.globl	_main
    	.globl	___main
    	.globl	_start

#############################################################################*
##### _start: initialize stack pointer,
#####         clear vector memory area,
#####         save program entry in vector 0
#####         call C main() function
#############################################################################*
_start:
	mov	$00776,sp
	clr	r0
L_0:
	clr	(r0)+
	cmp	r0, $400
	bne	L_0
        mov	$000137,*$0     # Store JMP _start in vector 0
        mov	$_start,*$2
	jsr 	pc,_main
	halt
        br	_start

#############################################################################*
##### ___main: called by C main() function. Currently does nothing
#############################################################################*
___main:
	rts	pc
On the PDP-11 memory locations 0 to 377 octal are used for vectors. Locations 400-777 octal are for floating vectors for communication and some other devices. Since memory is very limited on my real PDP-11 and it doesn’t contain such devices I’ve used locations 400-776 for the stack and load the executable binary at location 1000 octal. The crt0.s file initializes address 0 with a JMP _start instruction so that you can restart the program to starting execution at location 0.
To compile these files we can execute the following command:
pdp11-aout-gcc -nostdlib -Ttext 0x200 -m10 -Os \
    -N -e _start crt0.s console.c hello.c -o hello
(if you get an error that it can’t find pdp11-aout-gcc, make sure that $HOME/bin is on your PATH)
The -nostdlib option tells the compiler not to try linking with any system libraries. -Ttext 0x200 tells the linker to put the text or code section at hexadecimal address 0x200 (1000 octal). -m10 tells the compiler to limit the assembly instructions it generates to those a PDP 11/10 (or 11/05) understands. This means no multiply, divide or even XOR instructions. -Os means optimize for space. -N tells the linker put the data section immediately after the code section and not on its own page. In binutils 2.34, the page size was changed to 8192 bytes, which would mean that the data section would end up at a memory address greater than the total amount of memory in my PDP 11/05 (only 8K bytes). -e _start tells the linker to start execution at the _start function in crt0.s. This may or may not be at location 1000 octal depending on the order you link your object files. The compiled binary is placed in the a.out format file called hello.
The next step is to convert this a.out format binary to something we can feed the absolute loader. The absolute loader format is comprised of a series of records, each with a header containing the bytes: 1, 0, LSB length, MSB length, LSB address, MSB address, the data itself, and a checksum. The length is 6 + the data length, not including the checksum. If a record with a length of 6 is found, the loader will jump to the address include header to begin executing the program.
The aout2lda program reads the a.out format header to find the sizes and locations of the text, data and bus sections and the program entry point. To convert the hello a.out format file to a form suitable for the absolute loader, we can use the command:
aout2lda --aout hello --lda hello.ptap --data-align 2 \
    --text 0x200 --vector0
The options are: --aout hello means use the a.out format file called hello. --lda hello.ptap means create the file hello.ptap (paper tape or absolute loader format). --data-align 2 means align the data section on a 2 byte boundry (i.e. put it directly after the last text or code address). If you didn’t compile/link with the -N option before, then you would use --data-align 8192. --text 0x200 means begin the text or code section at hexadecimal address 0x200 (1000 octal). --vector0 adds a record to the absolute loader output that stores a JMP entry at address 0 so we can begin execution there.
Now comes the exciting part – running our first bare metal program. If you have a real PDP 11, you would toggle in the bootstrap, execute it to load the absolute loader DEC-11-L2PC-PO.ptap and then use that to load hello.ptap. If all goes well, your console will start printing 10 lines of “Hello World!”.
If you are using simh, you can use the following boot.ini file:
ECHO Preparing to boot and run Hello World

; Set CPU parameters - PDP-11/70 with 8kW (16kB) of core memory
SET CPU 11/70
SET CPU 16K

SET NOTHROTTLE
SET NOIDLE

; Disable devices that we don't need
SET HK DISABLE
SET RHA DISABLE
SET DZ DISABLE
SET RL DISABLE
SET RX DISABLE
SET RP DISABLE
SET RQ DISABLE
SET TM DISABLE
SET TQ DISABLE
SET RK DISABLE

; COMMENT REALCONS LINES OUT IF NOT USING PIDP-11
set realcons host=localhost
set realcons panel=11/70
set realcons interval=20
set realcons connected

load hello.ptap
go 0
Execute the boot.ini file by running pdp11 boot.ini
If you are using a PiDP-11, you’ll need to do a new more steps:
mkdir -p /opt/pidp11/systems/hello
cp hello.ptap boot.ini /opt/pidp11/systems/hello
Add a line 0010 hello to the end of /opt/pidp11/systems/selections using vi, nano or whatever your favourite editor is. You can then set the PiDP-11 console switches to 0010 octal and press the address knob to reboot. Once the PiDP-11 reboots it should print “Hello World!” 10 times on the console.
Printing Hello World is exciting, but it would be even more exciting if we would print something bigger and more interesting. I challenged myself to write a program that prints banners while fitting into the 8K of memory my PDP 11/05 has. It has the following features:
--double in mkfont can fit in 8K although with lower quality)
The source and executables are included in the package below. If you are on a PiDP-11, untar the file in /opt/pidp11/systems to create a banner directory. You’ll need to edit /opt/pidp11/systems/selections to add a line in for banner with whatever code you want to assign it.
To run it on a real PDP-11, toggle in the bootstrap, load the absolute loader and then load banner11.ptap. It comes pre-built with a serif font, but you can edit the Makefile and replace the BANNER_FONT line with whatever font you like. Rebuild with make.
The PDP 11/05 doesn’t have hardware multiple, divide or XOR instructions, so these need to be performed in software. The existing GCC distribution does not include these functions, so be aware that you will get linker errors because the compiler will try to call __divhi3 and related functions which aren’t implemented at this point.


